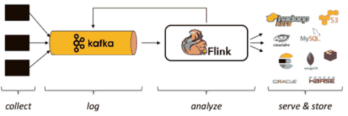
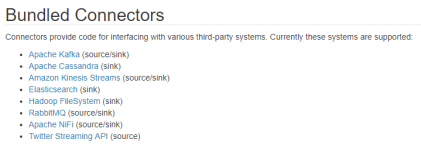
接下来我们说一下如何Flink整体流程相关的代码
首先是最简单,自己从内存中写入数据
| StreamExecutionEnvironment env = StreamExecutionEnvironment.getExecutionEnvironment();
env.setParallelism(1); // 1.从集合中读取数据 final DataStreamSource<Integer> numberDS = streamEnv.fromElements(1, 2, 3, 4, 5, 6); |
这样就是直接获取了生成了一个DataSource
其次是文件读取数据,这个我们之前也有使用过
| StreamExecutionEnvironment env = StreamExecutionEnvironment.getExecutionEnvironment();
env.setParallelism(1); // 1.从集合中读取数据 DataStreamSource<String> fileDS = env.readTextFile(“input/sensor-data.log”); |
而且Flink支持读取文件夹
在输入文件路径的时候,也是支持绝对路径和相对路径的
再其次是从Flink的好伙伴,Kafka中读取数据

需要添加相关的依赖
| <dependency>
<groupId>org.apache.flink</groupId> <artifactId>flink-connector-kafka_${scala.binary.version}</artifactId> <version>${flink.version}</version> </dependency> |
读取的代码如下
| Properties properties = new Properties();
properties.setProperty(“bootstrap.servers”, “linux1:9092”); properties.setProperty(“group.id”, “consumer-group”); properties.setProperty(“key.deserializer”, “org.apache.kafka.common.serialization.StringDeserializer”); properties.setProperty(“value.deserializer”, “org.apache.kafka.common.serialization.StringDeserializer”); properties.setProperty(“auto.offset.reset”, “latest”); DataStreamSource<String> kafkaDS = env.addSource( new FlinkKafkaConsumer<String>( “flink-test”, new SimpleStringSchema(), properties) ); |
仍然需要指定topic,gorupid等一系列参数,进行相关的使用
在最后,需要将数据源添加到环境中,也就是env.addSource
然后如果希望自己实现数据源,可以考虑实现SourceFuction函数
| class MyDataSource implements SourceFunction<WaterSensor> {
private volatile boolean runFlg = true; // TODO 生产数据 @Override public void run(SourceContext<WaterSensor> ctx) throws Exception { while ( runFlg ) { WaterSensor ws = new WaterSensor( “sensor_” + new Random().nextInt(5) + 1, System.currentTimeMillis(), new Random().nextInt(40) ); ctx.collect(ws); Thread.sleep(500); } } // TODO 取消生产数据 @Override public void cancel() { runFlg = false; } } |
在其中需要实现的函数有 run 和 cancel
然后在Source内部,利用一个volatile变量来确定数据源是否接入
其次是具体讲一下Flink中的Transformatior
主要是用于阐述数据的转换的,其实就是一种映射
最基础的就是其中的map函数,和Lambda中的map函数,就是将A数据类型转换为B数据类型
假设我们有一个简单的Integer数据集
final DataStreamSource<Integer> numberDS = streamEnv.fromElements(1, 2, 3, 4, 5, 6);
然后如果使用Lambda的方式书写mapHanshu
| final SingleOutputStreamOperator<Integer> map = numberDS.map(
num -> { return num * 2; } ); |
如果是实现Function的话
| final SingleOutputStreamOperator<Integer> map = numberDS.map(
new MapFunction<Integer, Integer>() { @Override public Integer map(Integer in) throws Exception { return in * 2; } } ); |
Map函数还有着对应的富函数实现
| final SingleOutputStreamOperator<String> map = numberDS.map(
new RichMapFunction<Integer, String>() { @Override public void open(Configuration parameters) throws Exception { System.out.println(“open…”); } @Override public String map(Integer value) throws Exception { // getRuntimeContext方法可以获取运行时环境 final RuntimeContext runtimeContext = this.getRuntimeContext(); return runtimeContext.getTaskName() + “>>>>” + value; } @Override public void close() throws Exception { System.out.println(“close…”); } } ); |
在富函数之中,可以通过环境上下文,获取一些额外的数据
富函数中的open表示这函数的开始,可以进行一些初始化,close表示函数的结束,进行一些收尾化操作
这是转换,除此外还可以flatmap,更为细化的进行拆分,消费一个元素来产生0到多个元素
| final SingleOutputStreamOperator<Integer> flatMapDS = numberDS.flatMap(
new FlatMapFunction<List<Integer>, Integer>() { @Override public void flatMap(List<Integer> numbers, Collector<Integer> out) throws Exception { // 将每一条数据取出来放置到采集器中 for (Integer num : numbers) { out.collect(num * 2); } } } ); |
还有一个Filter函数,用于过滤数据,留下符合条件的数据
| final SingleOutputStreamOperator<Integer> filter = numberDS.filter(
new FilterFunction<Integer>() { @Override public boolean filter(Integer num) throws Exception { return num % 2 != 0; } } ); |
然后就是类似SQL 中group by的函数,keyBy
| final DataStreamSource<WaterSensor> waterSensorDS =
streamEnv.fromElements( new WaterSensor(“1001”, System.currentTimeMillis(), 30), new WaterSensor(“1002”, System.currentTimeMillis(), 30), new WaterSensor(“1001”, System.currentTimeMillis(), 40), new WaterSensor(“1002”, System.currentTimeMillis(), 40) ); |
| final KeyedStream<WaterSensor, String> waterSensorStringKeyedStream = waterSensorDS.keyBy(
ws -> { return ws.getId(); } ); |
以及将数据打乱,随机分布到下游的api-shuffle
DataStream<String> streamShuffle = stream.shuffle();
还有着Fork-Join框架不可缺少的Join操作,对应到Flink中,就是reduce操作
将一个分组数据流的聚合操作,合并当前的元素,返回的数据流中包含每一次聚合的结果,并不只返回最后一次聚合的结果
| final SingleOutputStreamOperator<WaterSensor> reduce = waterSensorKS.reduce(
new ReduceFunction<WaterSensor>() { @Override public WaterSensor reduce(WaterSensor value1, WaterSensor value2) throws Exception { value1.setVc(value1.getVc() + value2.getVc()); return value1; } } // (ws1, ws2) -> { // return ws1; // } ); |
利用两两聚合来达到最终的结果
然后就是process
和reduce的定义类似,也是两两的方式处理数据,不过可以在处理过程中获取环境相关信息
| final SingleOutputStreamOperator<WaterSensor> process = waterSensorKS.process(
new KeyedProcessFunction<String, WaterSensor, WaterSensor>() { @Override // processElement方法是数据进行流后进行处理操作,其中有3个参数 // 第一个参数:到流的数据 // 第二个参数:当前的流环境对象 // 第三个参数:数据采集器,用于向后面的流传递数据 public void processElement(WaterSensor value, Context ctx, Collector<WaterSensor> out) throws Exception { //out.collect(ctx.getCurrentKey() + ” => ” + value.getVc()); out.collect(value); } } ); |
在执行process中,泛型需要三个参数,分别表示分流数据的类型,分流后的数据,修改完成的数据类型
然后函数中相关的参数有,当前流的数据,上下文,收集器
在Flink的整个流程中,除了数据源,转换函数,还有就是输出,这一点我们之前说过,Flink中称之为Sink
下沉,其实更像是一种导出的机制
之前我们使用DataSource的print
其实也是在这个DataSource中添加了一个输出到命令行的Sink
public DataStreamSink<T> print() {
PrintSinkFunction<T> printFunction = new PrintSinkFunction<>();
return addSink(printFunction).name(“Print to Std. Out”);
}
官方其实提供了一部分支持的输出


比如我们先拿一个Kafka Sink进行举例
首先创建一个本地的DataSource
| final DataStreamSource<String> waterSensorDS =
streamEnv.fromElements( “Hello”, “Flink”, “Kafka” ); |
然后便是创建Kakfa相关的Producer,并进行相关的存储
| Properties props = new Properties();
props.put(ProducerConfig.BOOTSTRAP_SERVERS_CONFIG, “linux1:9092”); FlinkKafkaProducer<String> producer = new FlinkKafkaProducer<String>( “topic-1” new KafkaSerializationSchema<String>() { @Override public ProducerRecord<byte[], byte[]> serialize(String s, @Nullable Long aLong) { return new ProducerRecord(“topic-1”, s.getBytes(StandardCharsets.UTF_8)); } }, props, FlinkKafkaProducer.Semantic.EXACTLY_ONCE ); |
最后在dataSource中添加Sink
waterSensorDS.addSink(producer);
之后便可以测试Kafka生产者和Flink的集成
除此之外,如果有自定义的需求
可以通过继承相关的类来自定义Sink
| class MySink extends RichSinkFunction<String> {
@Override public void open(Configuration parameters) throws Exception { super.open(parameters); } // invoke调用的意思,数据来了就可以进行处理 @Override public void invoke(String value, Context context) throws Exception { System.out.println(“value = ” + value); } @Override public void close() throws Exception { super.close(); } } |