我们来讲一下Kafka的生产者发送消息相关过程
首先在介绍完成Kakfa各个组件之后,我们先拿一个java如何集成Kafka发送数据开始看起,然后对Kafka的生产者的发送流程从代码层面进行一个梳理
首先是书写一个生产者的相关代码
首先创建对应的Properties
| Properties props = new Properties();
// 配置集群地址 props.put(“bootstrap.servers”, “linux1:9092”); // ACK应答 props.put(“acks”, “all”); // 重试次数 props.put(“retries”, 1); // 批次大小 16K props.put(“batch.size”, 16384); props.put(“linger.ms”, 1);//等待时间 // 缓冲区内存大小 32M props.put(“buffer.memory”, 33554432);//RecordAccumulator缓冲区大小 // Kafka发送数据时以k-v键值对方式发送 props.put(“key.serializer”, “org.apache.kafka.common.serialization.StringSerializer”); props.put(“value.serializer”, “org.apache.kafka.common.serialization.StringSerializer”); props.put(“interceptor.classes”, “com.atguigu.itdachang.kafka.MyProducerInterceptor”); |
其中配置了集群的相关配置
以及诸如重试次数的基本细腻
并利用这个配置项,创建出了一个KafkaProducer
KafkaProducer<String, String> producer = new KafkaProducer(props);
在创建出这个KafkaProducer之后,就可以利用其进行消息的发送了
producer.send(new ProducerRecord<String, String>(“itdachang”, “100”, “100”));
而在这个过程中,我们分别创建了KafkaProducer用于发送数据,以及创建了ProducerRecord进行数据信息的承载
看起来整体的发送就是如同下图
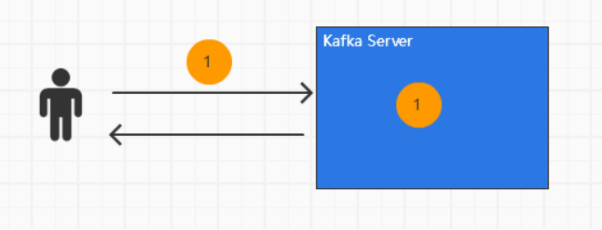
那么是否真的就如此的简单,我们从代码的角度出发,看下是否有所纰漏
首先是创建一个KafkaProducer的过程,我们传入了一个Properties对象
那么在Kafka的构造器中,会利用这个Properties对象进行解析
| KafkaProducer(ProducerConfig config, Serializer<K> keySerializer, Serializer<V> valueSerializer, ProducerMetadata metadata, KafkaClient kafkaClient, ProducerInterceptors<K, V> interceptors, Time time) {
try { this.producerConfig = config; this.time = time; String transactionalId = config.getString(“transactional.id”); this.clientId = config.getString(“client.id”); LogContext logContext; if (transactionalId == null) { logContext = new LogContext(String.format(“[Producer clientId=%s] “, this.clientId)); } else { logContext = new LogContext(String.format(“[Producer clientId=%s, transactionalId=%s] “, this.clientId, transactionalId)); } this.log = logContext.logger(KafkaProducer.class); this.log.trace(“Starting the Kafka producer”); Map<String, String> metricTags = Collections.singletonMap(“client-id”, this.clientId); MetricConfig metricConfig = (new MetricConfig()).samples(config.getInt(“metrics.num.samples”)).timeWindow(config.getLong(“metrics.sample.window.ms”), TimeUnit.MILLISECONDS).recordLevel(RecordingLevel.forName(config.getString(“metrics.recording.level”))).tags(metricTags); List<MetricsReporter> reporters = config.getConfiguredInstances(“metric.reporters”, MetricsReporter.class, Collections.singletonMap(“client.id”, this.clientId)); JmxReporter jmxReporter = new JmxReporter(); jmxReporter.configure(config.originals(Collections.singletonMap(“client.id”, this.clientId))); reporters.add(jmxReporter); MetricsContext metricsContext = new KafkaMetricsContext(“kafka.producer”, config.originalsWithPrefix(“metrics.context.”)); this.metrics = new Metrics(metricConfig, reporters, time, metricsContext); this.partitioner = (Partitioner)config.getConfiguredInstance(“partitioner.class”, Partitioner.class, Collections.singletonMap(“client.id”, this.clientId)); long retryBackoffMs = config.getLong(“retry.backoff.ms”); if (keySerializer == null) { this.keySerializer = (Serializer)config.getConfiguredInstance(“key.serializer”, Serializer.class); this.keySerializer.configure(config.originals(Collections.singletonMap(“client.id”, this.clientId)), true); } else { config.ignore(“key.serializer”); this.keySerializer = keySerializer; } if (valueSerializer == null) { this.valueSerializer = (Serializer)config.getConfiguredInstance(“value.serializer”, Serializer.class); this.valueSerializer.configure(config.originals(Collections.singletonMap(“client.id”, this.clientId)), false); } else { config.ignore(“value.serializer”); this.valueSerializer = valueSerializer; } List<ProducerInterceptor<K, V>> interceptorList = config.getConfiguredInstances(“interceptor.classes”, ProducerInterceptor.class, Collections.singletonMap(“client.id”, this.clientId)); if (interceptors != null) { this.interceptors = interceptors; } else { this.interceptors = new ProducerInterceptors(interceptorList); } ClusterResourceListeners clusterResourceListeners = this.configureClusterResourceListeners(keySerializer, valueSerializer, interceptorList, reporters); this.maxRequestSize = config.getInt(“max.request.size”); this.totalMemorySize = config.getLong(“buffer.memory”); this.compressionType = CompressionType.forName(config.getString(“compression.type”)); this.maxBlockTimeMs = config.getLong(“max.block.ms”); int deliveryTimeoutMs = configureDeliveryTimeout(config, this.log); this.apiVersions = new ApiVersions(); this.transactionManager = this.configureTransactionState(config, logContext); this.accumulator = new RecordAccumulator(logContext, config.getInt(“batch.size”), this.compressionType, lingerMs(config), retryBackoffMs, deliveryTimeoutMs, this.metrics, “producer-metrics”, time, this.apiVersions, this.transactionManager, new BufferPool(this.totalMemorySize, config.getInt(“batch.size”), this.metrics, time, “producer-metrics”)); List<InetSocketAddress> addresses = ClientUtils.parseAndValidateAddresses(config.getList(“bootstrap.servers”), config.getString(“client.dns.lookup”)); if (metadata != null) { this.metadata = metadata; } else { this.metadata = new ProducerMetadata(retryBackoffMs, config.getLong(“metadata.max.age.ms”), config.getLong(“metadata.max.idle.ms”), logContext, clusterResourceListeners, Time.SYSTEM); this.metadata.bootstrap(addresses); } this.errors = this.metrics.sensor(“errors”); this.sender = this.newSender(logContext, kafkaClient, this.metadata); String ioThreadName = “kafka-producer-network-thread | ” + this.clientId; this.ioThread = new KafkaThread(ioThreadName, this.sender, true); this.ioThread.start(); config.logUnused(); AppInfoParser.registerAppInfo(“kafka.producer”, this.clientId, this.metrics, time.milliseconds()); this.log.debug(“Kafka producer started”); } catch (Throwable var22) { this.close(Duration.ofMillis(0L), true); throw new KafkaException(“Failed to construct kafka producer”, var22); } } |
其中比较重要的配置项有
配置了clientId 客户端id
Interceptors 拦截器
compressionType 压缩类型
partitioner
DefaultPartitioner 分区器
maxRequestSize 最大请求大小
accumulator 缓冲器
sender 发送器
ioThread Sender的发送线程
其中的重点在于sender和accumulator
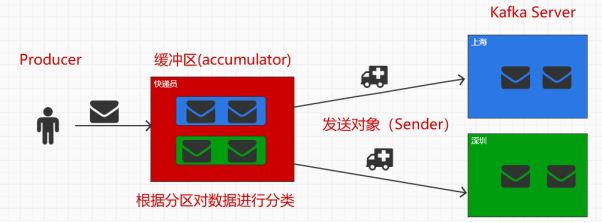
而缓冲器的出现,证明了其并不是有一条消息需要等待发送的时候就立刻发送,而是在等待一批数据就绪的时候,一起发送给Kafka
那么我们从简的梳理下整体的过程
在一个ProducerRecord创建出来之后,如何放入Producer中进行发送的
而一个ProducerRecord,其内部属性有
| private final String topic;
private final Integer partition; private final Headers headers; private final K key; private final V value; private final Long timestamp; |
分别是
Topic praition headers key value timestamp
不过一般来说,我们只需要传入topic key value即可
在我们调用了send方法后
首先在KafkaProducer中,首先遇到的是上面说的interceptors
其封装为了一个ProducerInterceptors对象
其中的onSend函数会循环遍历每一个拦截器对象,并调用每一个onSend函数,利用每一个拦截器的onSend函数,对其进行加工
这个onSend函数,我们可以通过实现一个ProducerInterceptor接口的实现类,进行相关的测试
| // 自定义拦截器
public class MyProducerInterceptor implements ProducerInterceptor { @Override public ProducerRecord onSend(ProducerRecord oldRecord) { ProducerRecord newRecord = new ProducerRecord(oldRecord.topic(), oldRecord.key(), “test:” + oldRecord.value()); return newRecord; } } |
在其中,我们可以看出来,传入了一个ProducerRecord,在其中,重新进行了封装并返回Record
返回send的主线
再之后,在其下的doSend函数中
创建了一个为null的TopicPartition对象
然后准备好了元数据waitOnMetadata
| try {
clusterAndWaitTime = this.waitOnMetadata(record.topic(), record.partition(), nowMs, this.maxBlockTimeMs); } catch (KafkaException var22) { if (this.metadata.isClosed()) { throw new KafkaException(“Producer closed while send in progress”, var22); } throw var22; } |
然后分别对key和value进行了序列化
| byte[] serializedKey;
try { serializedKey = this.keySerializer.serialize(record.topic(), record.headers(), record.key()); } catch (ClassCastException var21) { throw new SerializationException(“Can’t convert key of class ” + record.key().getClass().getName() + ” to class ” + this.producerConfig.getClass(“key.serializer”).getName() + ” specified in key.serializer”, var21); } byte[] serializedValue; try { serializedValue = this.valueSerializer.serialize(record.topic(), record.headers(), record.value()); } catch (ClassCastException var20) { throw new SerializationException(“Can’t convert value of class ” + record.value().getClass().getName() + ” to class ” + this.producerConfig.getClass(“value.serializer”).getName() + ” specified in value.serializer”, var20); } |
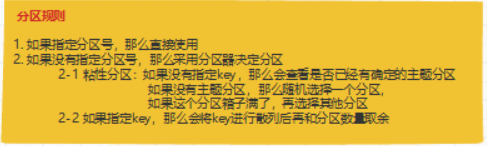
然后调用选择分区的函数,确定一个分区
| int partition = this.partition(record, serializedKey, serializedValue, cluster);
tp = new TopicPartition(record.topic(), partition); |
确定size大小,如果超过设定大小,则会报错
| int serializedSize = AbstractRecords.estimateSizeInBytesUpperBound(this.apiVersions.maxUsableProduceMagic(), this.compressionType, serializedKey, serializedValue, headers);
this.ensureValidRecordSize(serializedSize); |
最后将Record放入accumulator中
| RecordAppendResult result = this.accumulator.append(tp, timestamp, serializedKey, serializedValue, headers, interceptCallback, remainingWaitMs, true, nowMs); |
整体的发送逻辑如下,从KafkaProducer到最后的accumulator
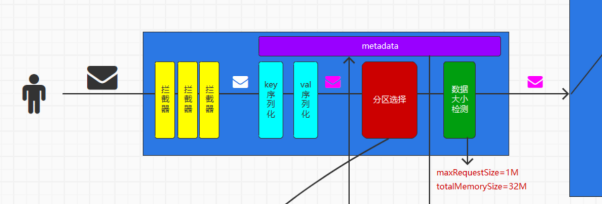
那我们会分别拆解着看上面的流程
而从上往下看这个发送流程,会发现在发送的第二步,也就是拦截器处理完成之后,会等待一个metadata的同步
也就是上面的waitOnMetadata函数,毕竟在发送的时候,的确是需要metadata的数据,即topic partition等相关数据的
在这个函数的内部首先存在着一个Cluster,其中包含的属性有
| private final boolean isBootstrapConfigured;
private final List<Node> nodes; private final Set<String> unauthorizedTopics; private final Set<String> invalidTopics; private final Set<String> internalTopics; private final Node controller; private final Map<TopicPartition, PartitionInfo> partitionsByTopicPartition; private final Map<String, List<PartitionInfo>> partitionsByTopic; private final Map<String, List<PartitionInfo>> availablePartitionsByTopic; private final Map<Integer, List<PartitionInfo>> partitionsByNode; private final Map<Integer, Node> nodesById; private final ClusterResource clusterResource; private final Map<String, Uuid> topicIds; |
而这个Cluster的来源,是由KafkaProducer中的metadata属性提供的
Cluster cluster = this.metadata.fetch();
Metadata中包含了Kafka集群的各种属性
| private final Logger log;
private final long refreshBackoffMs; private final long metadataExpireMs; private int updateVersion; private int requestVersion; private long lastRefreshMs; private long lastSuccessfulRefreshMs; private KafkaException fatalException; private Set<String> invalidTopics; private Set<String> unauthorizedTopics; private MetadataCache cache = MetadataCache.empty(); private boolean needFullUpdate; private boolean needPartialUpdate; private final ClusterResourceListeners clusterResourceListeners; private boolean isClosed; private final Map<TopicPartition, Integer> lastSeenLeaderEpochs; private final long metadataIdleMs; private final Map<String, Long> topics = new HashMap(); private final Set<String> newTopics = new HashSet(); private final Logger log; private final Time time; |
那么摆在我们面前的一个首要问题就是,这些信息是从哪来的
因为从前面我们也了解到了,一个topic往往对应着多个分区,获取这些分区的数量,要发送的目标分区,目标分区的leader leader的节点地址,都要从metadata中获取
那么在waitOnMetadata中,整体执行如下
| if (cluster.invalidTopics().contains(topic)) {
throw new InvalidTopicException(topic); } |
如果非法的topic中包含请求的topic,那么久抛出异常
如果没有,则进行如下的操作
首先metadata添加这个topic
this.metadata.add(topic, nowMs);
这个函数中,会判断现在的metadata是否包含这个topic,如果不包含,那么就需要更新下metadata,即将requestVersion加一,并且将lastRefreshMs设置为0,将needUpdate设置为true
| public synchronized void add(String topic, long nowMs) {
Objects.requireNonNull(topic, “topic cannot be null”); if (this.topics.put(topic, nowMs + this.metadataIdleMs) == null) { this.newTopics.add(topic); this.requestUpdateForNewTopics(); } } public synchronized int requestUpdateForNewTopics() { this.lastRefreshMs = 0L; this.needPartialUpdate = true; ++this.requestVersion; return this.updateVersion; } |
判断是否可以从缓存中获取到分区信息
| if (partitionsCount != null && (partition == null || partition < partitionsCount)) {
return new KafkaProducer.ClusterAndWaitTime(cluster, 0L); } |
不能从缓存中获取,那么就去Kafka主机中拿
| do {
do { } while(partitionsCount == null); } while(partition != null && partition >= partitionsCount); |
两个do-while结构,要求,必须要拿到分区信息
在其中看起来没做什么显式的调用,只是进行了sender的一个wakeup,但是这个wakeup使我们执行的关键
其会不断的向下唤醒,从sender到KafkaClient的实现类NetworkClient,而在其中,会唤醒Selector
首先是sender被唤醒后的run,会在其中调用到client的poll方法
而client的poll方法,则是我们讲解的主要目标
首先是判断是否需要更新metadata,如果需要更新,那么就返回等待更新的时间
long metadataTimeout = this.metadataUpdater.maybeUpdate(now);
然后调用selector发送请求
this.selector.poll(Utils.min(timeout, new long[]{metadataTimeout, (long)this.defaultRequestTimeoutMs}));
然后在下面不断处理返回结果
| List<ClientResponse> responses = new ArrayList();
this.handleCompletedSends(responses, updatedNow); this.handleCompletedReceives(responses, updatedNow); this.handleDisconnections(responses, updatedNow); this.handleConnections(); this.handleInitiateApiVersionRequests(updatedNow); this.handleTimedOutConnections(responses, updatedNow); this.handleTimedOutRequests(responses, updatedNow); this.completeResponses(responses); return responses; |
在其中,首先看maybeUpdate中是如何判断需要更新的
在maybeUpdate中,首先判断metadata是否需要更新,为metadata的timeToNextUpdate
| public synchronized long timeToNextUpdate(long nowMs) {
long timeToExpire = this.updateRequested() ? 0L : Math.max(this.lastSuccessfulRefreshMs + this.metadataExpireMs – nowMs, 0L); return Math.max(timeToExpire, this.timeToAllowUpdate(nowMs)); } |
上面计算了下一次更新的时间,如果needUpdate这个属性为true,那就返回0,表示立刻更新
不然就计算过期时间
然后判断是否可以更新,利用timeToExpire和timeToAllowUpdate计算判断
计算完成之后,获取到最小负载节点
Node node = NetworkClient.this.leastLoadedNode(now);
这一点,是根据每一个Node在InFlightRequest中还没有确定的请求数决定的,没有确定的请求越少则负载越小
接下来往下走maybeUpdate
获取到了node,需要根据node的状态进行判断
| if (NetworkClient.this.canSendRequest(nodeConnectionId, now)) {
MetadataRequestAndVersion requestAndVersion = this.metadata.newMetadataRequestAndVersion(now); org.apache.kafka.common.requests.MetadataRequest.Builder metadataRequest = requestAndVersion.requestBuilder; NetworkClient.this.log.debug(“Sending metadata request {} to node {}”, metadataRequest, node); NetworkClient.this.sendInternalMetadataRequest(metadataRequest, nodeConnectionId, now); this.inProgress = new NetworkClient.DefaultMetadataUpdater.InProgressData(requestAndVersion.requestVersion, requestAndVersion.isPartialUpdate, (SyntheticClass_1)null); return (long)NetworkClient.this.defaultRequestTimeoutMs; |
如果可以发送请求,就构建请求,进行发送
| else if (this.isAnyNodeConnecting()) {
return NetworkClient.this.reconnectBackoffMs; } else if (NetworkClient.this.connectionStates.canConnect(nodeConnectionId, now)) { NetworkClient.this.log.debug(“Initialize connection to node {} for sending metadata request”, node); NetworkClient.this.initiateConnect(node, now); return NetworkClient.this.reconnectBackoffMs; } |
如果是正在建立连接,就直接返回,不然就向broker初始化连接
发送完成之后,等待selector poll一段时间
然后在下面的handler方法中处理更新metadata信息
| while(true) {
while(var4.hasNext()) { NetworkReceive receive = (NetworkReceive)var4.next(); String source = receive.source(); NetworkClient.InFlightRequest req = this.inFlightRequests.completeNext(source); AbstractResponse response = parseResponse(receive.payload(), req.header); if (this.throttleTimeSensor != null) { this.throttleTimeSensor.record((double)response.throttleTimeMs(), now); } if (this.log.isDebugEnabled()) { this.log.debug(“Received {} response from node {} for request with header {}: {}”, new Object[]{req.header.apiKey(), req.destination, req.header, response}); } this.maybeThrottle(response, req.header.apiVersion(), req.destination, now); if (req.isInternalRequest && response instanceof MetadataResponse) { this.metadataUpdater.handleSuccessfulResponse(req.header, now, (MetadataResponse)response); } else if (req.isInternalRequest && response instanceof ApiVersionsResponse) { this.handleApiVersionsResponse(responses, req, now, (ApiVersionsResponse)response); } else { responses.add(req.completed(response, now)); } } return; } |
其中重点在于判断类型
| if (req.isInternalRequest && response instanceof MetadataResponse) {
this.metadataUpdater.handleSuccessfulResponse(req.header, now, (MetadataResponse)response); } else if (req.isInternalRequest && response instanceof ApiVersionsResponse) { this.handleApiVersionsResponse(responses, req, now, (ApiVersionsResponse)response); } else { responses.add(req.completed(response, now)); } |
如果是metaupdateResponse,那么就更新metadata
那么这就是一个基本的meta相关数据的更新全流程
然后回到我们的主线
抛开序列化,我们直接看他们对于partition的选择
关于这一点,我们追寻着代码一路往下查
| public int partition(String topic, Object key, byte[] keyBytes, Object value, byte[] valueBytes, Cluster cluster, int numPartitions) {
return keyBytes == null ? this.stickyPartitionCache.partition(topic, cluster) : Utils.toPositive(Utils.murmur2(keyBytes)) % numPartitions; } |
如果没有key的话,则从缓存中查询一个出来
如果有的话,就进行随机散列后取一个出来
其次是一些对于数据长度的校验,分别对这条数据的大小maxRequestSize
和内存整体大小 totalMemorySize 进行校验
之后便是将这个数据添加到accumulator
RecordAppendResult result = this.accumulator.append(tp, timestamp, serializedKey, serializedValue, headers, interceptCallback, remainingWaitMs, true, nowMs);
而在这个append函数中
首先是根据TopicPartition获取到Deque
Deque<ProducerBatch> dq = this.getOrCreateDeque(tp);
上面的函数名就表明了,如果获取不到,就创建一个,关于这个函数具体的实现,我们在下面会进行讲解
获取到了双端队列之后,尝试往其中,添加这条数据
RecordAccumulator.RecordAppendResult appendResult = this.tryAppend(timestamp, key, value, headers, callback, dq, nowMs);
函数内部很简单
| private RecordAccumulator.RecordAppendResult tryAppend(long timestamp, byte[] key, byte[] value, Header[] headers, Callback callback, Deque<ProducerBatch> deque, long nowMs) {
ProducerBatch last = (ProducerBatch)deque.peekLast(); if (last != null) { FutureRecordMetadata future = last.tryAppend(timestamp, key, value, headers, callback, nowMs); if (future != null) { return new RecordAccumulator.RecordAppendResult(future, deque.size() > 1 || last.isFull(), false, false); } last.closeForRecordAppends(); } return null; } |
其中从队列的最后面获取到了一个Batch,也就是所谓的包裹,然后往这个包裹添加这条数据
在这个包裹添加的时候,也是可能由于包裹本身剩余大小不够,导致无法添加进去的
| public FutureRecordMetadata tryAppend(long timestamp, byte[] key, byte[] value, Header[] headers, Callback callback, long now) {
if (!this.recordsBuilder.hasRoomFor(timestamp, key, value, headers)) { return null; } else { Long checksum = this.recordsBuilder.append(timestamp, key, value, headers); this.maxRecordSize = Math.max(this.maxRecordSize, AbstractRecords.estimateSizeInBytesUpperBound(this.magic(), this.recordsBuilder.compressionType(), key, value, headers)); this.lastAppendTime = now; FutureRecordMetadata future = new FutureRecordMetadata(this.produceFuture, (long)this.recordCount, timestamp, checksum, key == null ? -1 : key.length, value == null ? -1 : value.length, Time.SYSTEM); this.thunks.add(new ProducerBatch.Thunk(callback, future)); ++this.recordCount; return future; } } |
如果这个包裹真的满了,创建一个添加失败,因为包裹已满的结果返回返回去
| if (abortOnNewBatch) {
RecordAccumulator.RecordAppendResult var31 = new RecordAccumulator.RecordAppendResult((FutureRecordMetadata)null, false, false, true); return var31; } |
在Producer中,如果返回的是包裹已满的结果
那么就重新查找一个partition,并往这个新的partition中插入这条数据
| if (result.abortForNewBatch) {
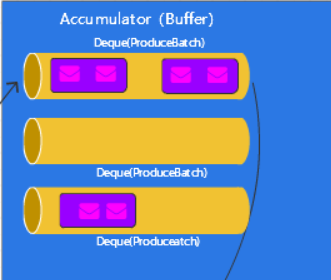
int prevPartition = partition; this.partitioner.onNewBatch(record.topic(), cluster, partition); partition = this.partition(record, serializedKey, serializedValue, cluster); tp = new TopicPartition(record.topic(), partition); if (this.log.isTraceEnabled()) { this.log.trace(“Retrying append due to new batch creation for topic {} partition {}. The old partition was {}”, new Object[]{record.topic(), partition, prevPartition}); } interceptCallback = new KafkaProducer.InterceptorCallback(callback, this.interceptors, tp); result = this.accumulator.append(tp, timestamp, serializedKey, serializedValue, headers, interceptCallback, remainingWaitMs, false, nowMs); } |
整体的结构如下图
再往后,添加结果进去包裹了,会在下面判断包裹是否需要发送
| if (result.batchIsFull || result.newBatchCreated) {
this.log.trace(“Waking up the sender since topic {} partition {} is either full or getting a new batch”, record.topic(), partition); this.sender.wakeup(); } |
将sender进行唤醒
触发一次sender的run
会接下来触发一次runonce,而在runOnce中,会发送这个生产数据
long pollTimeout = this.sendProducerData(currentTimeMs);
在sendProducerData函数中
首先根据分区的leader,明确leader对应的节点
对应的函数就在下面sendProducerData中的drain
Map<Integer, List<ProducerBatch>> batches = this.accumulator.drain(cluster, result.readyNodes, this.maxRequestSize, now);
| public Map<Integer, List<ProducerBatch>> drain(Cluster cluster, Set<Node> nodes, int maxSize, long now) {
if (nodes.isEmpty()) { return Collections.emptyMap(); } else { Map<Integer, List<ProducerBatch>> batches = new HashMap(); Iterator var7 = nodes.iterator(); while(var7.hasNext()) { Node node = (Node)var7.next(); List<ProducerBatch> ready = this.drainBatchesForOneNode(cluster, node, maxSize, now); batches.put(node.id(), ready); } return batches; } } |
在缓冲器中,遍历每一个node,然后由node为核心,判断每一个node上该传输的包裹(ProducerBatch)
最终在sender上形成一个
Map<Integer,List<ProducerBatch>>,key对应的nodeid,value对应着包裹数组
之后便是创建ProducerRequest进行发送
| private void sendProduceRequests(Map<Integer, List<ProducerBatch>> collated, long now) {
Iterator var4 = collated.entrySet().iterator(); while(var4.hasNext()) { Entry<Integer, List<ProducerBatch>> entry = (Entry)var4.next(); this.sendProduceRequest(now, (Integer)entry.getKey(), this.acks, this.requestTimeoutMs, (List)entry.getValue()); } } |
按照分区,进行相关的发送
再具体的request发送代码中
| private void sendProduceRequest(long now, int destination, short acks, int timeout, List<ProducerBatch> batches) {
if (!batches.isEmpty()) { Map<TopicPartition, ProducerBatch> recordsByPartition = new HashMap(batches.size()); byte minUsedMagic = this.apiVersions.maxUsableProduceMagic(); Iterator var9 = batches.iterator(); while(var9.hasNext()) { ProducerBatch batch = (ProducerBatch)var9.next(); if (batch.magic() < minUsedMagic) { minUsedMagic = batch.magic(); } } TopicProduceDataCollection tpd = new TopicProduceDataCollection(); Iterator var16 = batches.iterator(); while(var16.hasNext()) { ProducerBatch batch = (ProducerBatch)var16.next(); TopicPartition tp = batch.topicPartition; MemoryRecords records = batch.records(); if (!records.hasMatchingMagic(minUsedMagic)) { records = (MemoryRecords)batch.records().downConvert(minUsedMagic, 0L, this.time).records(); } TopicProduceData tpData = tpd.find(tp.topic()); if (tpData == null) { tpData = (new TopicProduceData()).setName(tp.topic()); tpd.add(tpData); } tpData.partitionData().add((new PartitionProduceData()).setIndex(tp.partition()).setRecords(records)); recordsByPartition.put(tp, batch); } String transactionalId = null; if (this.transactionManager != null && this.transactionManager.isTransactional()) { transactionalId = this.transactionManager.transactionalId(); } org.apache.kafka.common.requests.ProduceRequest.Builder requestBuilder = ProduceRequest.forMagic(minUsedMagic, (new ProduceRequestData()).setAcks(acks).setTimeoutMs(timeout).setTransactionalId(transactionalId).setTopicData(tpd)); RequestCompletionHandler callback = (response) -> { this.handleProduceResponse(response, recordsByPartition, this.time.milliseconds()); }; String nodeId = Integer.toString(destination); ClientRequest clientRequest = this.client.newClientRequest(nodeId, requestBuilder, now, acks != 0, this.requestTimeoutMs, callback); this.client.send(clientRequest, now); this.log.trace(“Sent produce request to {}: {}”, nodeId, requestBuilder); } } |
组装成为了requestBuilder,并再次封装为了clientRequest,发送出去
然后在上面我们将handleProducerResponse作为了callback传了出去,那么这个handlerProducerResponse我们需要看下
在这个处理器函数中
首先对返回值是否存在问题进行判断
| if (response.wasDisconnected()) {
this.log.trace(“Cancelled request with header {} due to node {} being disconnected”, requestHeader, response.destination()); var7 = batches.values().iterator(); while(var7.hasNext()) { batch = (ProducerBatch)var7.next(); this.completeBatch(batch, new PartitionResponse(Errors.NETWORK_EXCEPTION, String.format(“Disconnected from node %s”, response.destination())), (long)correlationId, now); } } else if (response.versionMismatch() != null) { this.log.warn(“Cancelled request {} due to a version mismatch with node {}”, new Object[]{response, response.destination(), response.versionMismatch()}); var7 = batches.values().iterator(); while(var7.hasNext()) { batch = (ProducerBatch)var7.next(); this.completeBatch(batch, new PartitionResponse(Errors.UNSUPPORTED_VERSION), (long)correlationId, now); } } |
如果没有问题,那么最终会走到completeBatch中
在complete中,也会判断是否有Error
| this.log.warn(“Got error produce response in correlation id {} on topic-partition {}, splitting and retrying ({} attempts left). Error: {}”, new Object[]{correlationId, batch.topicPartition, this.retries – batch.attempts(), this.formatErrMsg(response)});
if (this.transactionManager != null) { this.transactionManager.removeInFlightBatch(batch); } this.accumulator.splitAndReenqueue(batch); this.maybeRemoveAndDeallocateBatch(batch); this.sensors.recordBatchSplit(); } |
如果是消息过大的类型,那么会移除这个包裹,然后拆分后再发出
| else if (error != Errors.NONE) {
if (this.canRetry(batch, response, now)) { this.log.warn(“Got error produce response with correlation id {} on topic-partition {}, retrying ({} attempts left). Error: {}”, new Object[]{correlationId, batch.topicPartition, this.retries – batch.attempts() – 1, this.formatErrMsg(response)}); this.reenqueueBatch(batch, now); } else if (error == Errors.DUPLICATE_SEQUENCE_NUMBER) { this.completeBatch(batch, response); } else { Object exception; if (error == Errors.TOPIC_AUTHORIZATION_FAILED) { exception = new TopicAuthorizationException(Collections.singleton(batch.topicPartition.topic())); } else if (error == Errors.CLUSTER_AUTHORIZATION_FAILED) { exception = new ClusterAuthorizationException(“The producer is not authorized to do idempotent sends”); } else { exception = error.exception(response.errorMessage); } this.failBatch(batch, response, (RuntimeException)exception, batch.attempts() < this.retries); } if (error.exception() instanceof InvalidMetadataException) { if (error.exception() instanceof UnknownTopicOrPartitionException) { this.log.warn(“Received unknown topic or partition error in produce request on partition {}. The topic-partition may not exist or the user may not have Describe access to it”, batch.topicPartition); } else { this.log.warn(“Received invalid metadata error in produce request on partition {} due to {}. Going to request metadata update now”, batch.topicPartition, error.exception(response.errorMessage).toString()); } this.metadata.requestUpdate(); } |
其他错误则可能有不同的处理方式
如果正常的,那么就走completeBatch方法
最终把Batch从缓冲区中去掉
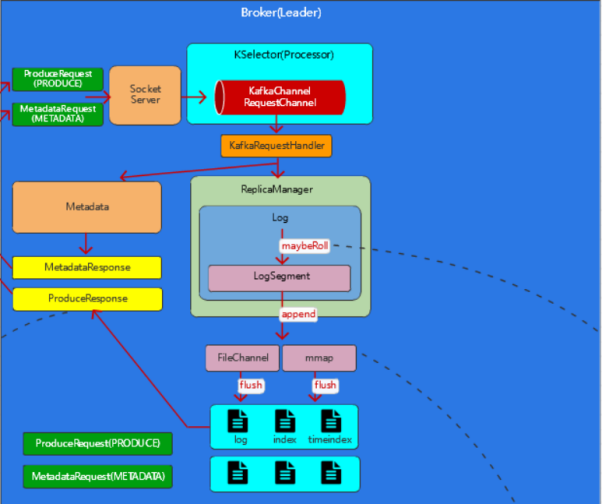
在Kafka Server端
根据ApiKeys来确定消息类型,如果是ProducerRequest类型
然后在下面的handleProduceRequest中
首先会整个请求进行校验,诸如长度校验等
然后将所有过滤后的消息交给replicaManger处理
在replicaManger之中,主要的函数就是appendToLocalLog
其中会获取分区,并进行添加数据到分区领导者
| val partition = getPartitionOrException(topicPartition)
val info = partition.appendRecordsToLeader(records, origin, requiredAcks) |
而partition中,则会往log对象中添加数据
val info = log.append(records, assignOffsets = true)
而这个Log对象,是对Partition数据目录的抽象,管理着某个topic在某个broker中的一个partition
内部还维护着多个LogSegment对象,也就是日志的分段,方便日后根据Index及TimeIndex进行查找
那么也就需要我们判断这个Batch和Segment的关系
if (validRecords.sizeInBytes > config.segmentSize) {
throw new RecordBatchTooLargeException(“Message set size is %d bytes which exceeds the maximum configured segment size of %d.”
.format(validRecords.sizeInBytes, config.segmentSize))
}
此代码用于消息是否大于一个Segment
val segment = maybeRoll(messagesSize = validRecords.sizeInBytes,
maxTimestampInMessages = appendInfo.maxTimestamp,
maxOffsetInMessages = appendInfo.lastOffset)
用于判断是否需要创建一个新的Segment
最终会调用segment的方法来添加进去
segment.append(firstOffset = appendInfo.firstOffset,
largestOffset = appendInfo.lastOffset,
largestTimestamp = appendInfo.maxTimestamp,
shallowOffsetOfMaxTimestamp = appendInfo.offsetOfMaxTimestamp,
records = validRecords)
在segment中,需要由其来维护Log文件的落盘和索引文件的关系
首先是将记录添加到log的channel中
val appendedBytes = log.append(records)
其次是在index 文件中添加上对应的偏移量
最终维护上时间index文件
//bytesSinceLastIndexEntry会随着消息的写入不断增加,直到生成一条新的索引记录后重置为0
//indexIntervalBytes和broker的配置有关
if (bytesSinceLastIndexEntry > indexIntervalBytes) {
index.append(firstOffset, physicalPosition)
timeIndex.maybeAppend(maxTimestampSoFar, offsetOfMaxTimestamp)
bytesSinceLastIndexEntry = 0
}
整体流程我们串一下
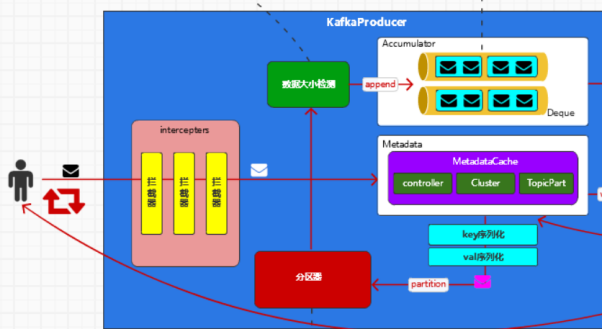
首先用户发送一个请求
然后由于有拦截器,分别是数据大小的检测,并加入到缓冲器accumulator
而在加入缓冲器之前,是会根据数据进行分区,分区规则如下
形成一个Map,Key为分区相关信息,value为发送的消息集合
而accumulator缓冲区的发送,需要拉取metadata
Metadata中存了集群相关信息,诸如controller,Cluster,TopicPart
在metadata的拉取中
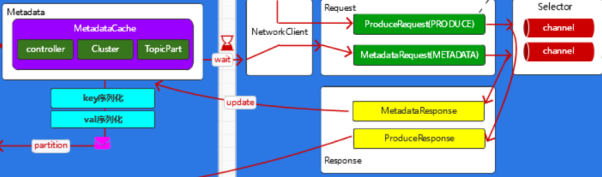
分别是发出请求,Server对Request处理,再放回channel,形成Response
然后accumulator在有了元数据之后,需要进行消息的发送

发送之前,将消息组成,以Node为key,数据集合为value的Data
而在Server端的处理生产消息的Request中,会分别进行如下的操作
这里面存在着Log,要求是Leader Partition的Log文件
而不是其他的Replica
而不同的Replica,引申出了我们下一章要将的Kafka集群中的AR OSR ISR概念