MCP之中的提示词工程
在MCP之中,提示词Prompt和资源Resource,工具Tool 一样重要,可以为客户端提供一个标准化的,结构化的,可以复用的对话模板。从而做到在用户给出少量提示之后,利用大模型得到满意的答复。
而提示词对于大模型的重要不言而喻,也是业界一直强调的内容。诸如通过Few shot example来增强大模型上下文对话能力。诸如各类提示工程来增强大模型的思维能力。
这里我们举一个提示词和领域知识结合的例子
比如对于教育界来说,教师在进行教学的时候,往往面对的问题不是没有资源,而是如何利用资源,这也是提示工程擅长的部分。
比如将传统的教学,转换为一个具备 反思-引导-生成-反馈的提示体系。
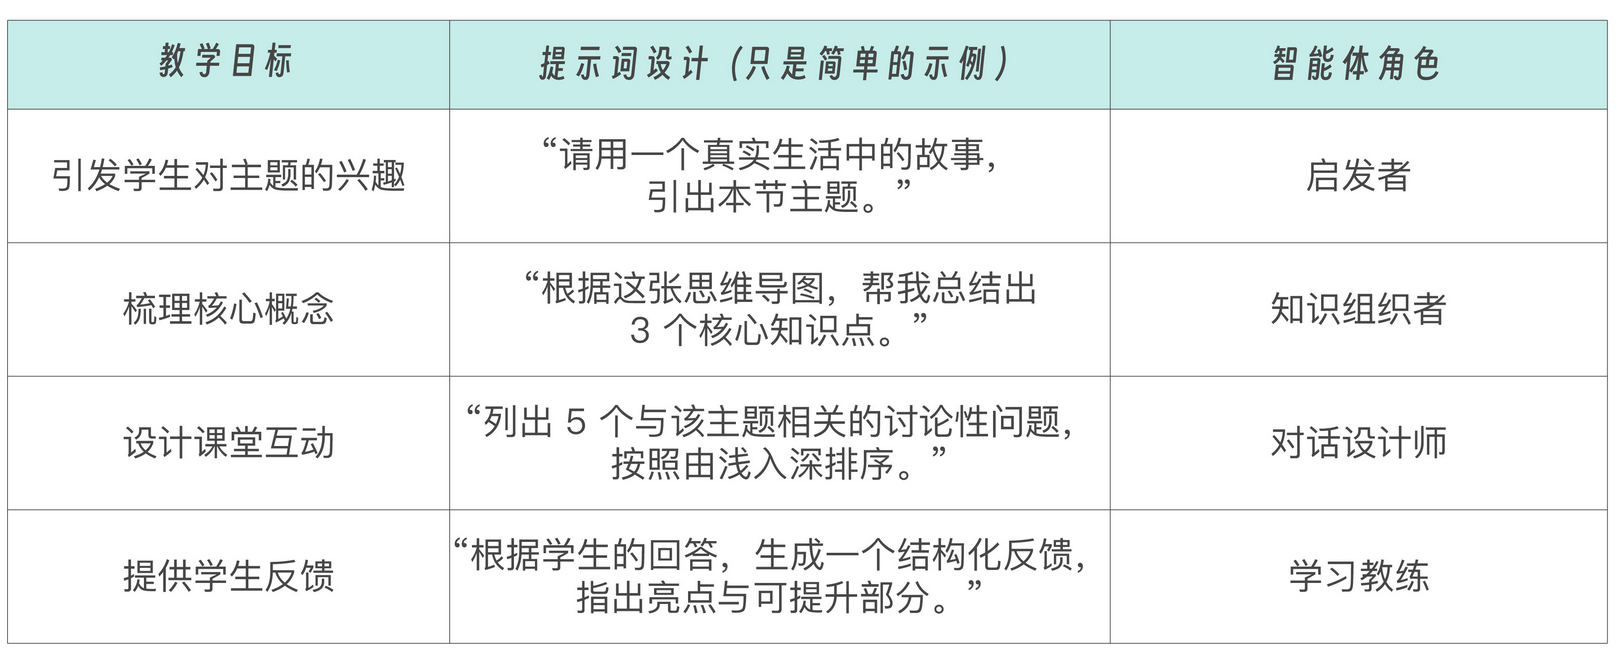
这里的方法本质,就是将教育场景的教学思维导图,结构化的表达为提示词模板
通过用户特定的输入,比如课本上的一个章节,结合特定的Prompt。最终输出一个合格的教案。
那么到MCP之中,我们就可以将其内置进去,通过一个合适的预置提示词,让大模型依次使用这些提示词,最终形成一个教案。
除此外,我们还可以在MCP HOST之中定义一系列的菜单或者按钮,来触发LLM任务。
因此在MCP之中,具体的设计流程就是在服务器端提前定义好一套Prompt模板,通过MCP暴露给客户,支持用户或者产品以一致的方式进行选填并调用。
MCP之中的提示词具有一系列的特性,诸如 参数化,支持Client输入一系列的参数来动态生成。 资源整合,可以嵌入一系列的上下文。统一发现,通过prompts/list和prompts/get接口来统一调用和注册。
这里我们看下MCP中模板的具体技术实现。
每个提示中包含一系列的字段,诸如 name, description, arguments
| {
name: string; // 提示的唯一标识符 description?: string; // 可选的人类可读描述 arguments?: [ // 可选参数列表 { name: string; description?: string; required?: boolean; } ] } |
例如下面的模板示例
| {
“name”: “explain-code”, “description”: “Explain how a code snippet works”, “arguments”: [ { “name”: “code”, “description”: “The code to explain”, “required”: true }, { “name”: “language”, “description”: “The programming language”, “required”: false } ] } |
基于这个提示模板,客户端在调用的时候的请求为
| {
“jsonrpc”: “2.0”, “id”: 1, “method”: “prompts/get”, “params”: { “name”: “explain-code”, “arguments”: { “code”: “def foo(): return 42”, “language”: “python” } } } |
并且可以获取到的响应格式如下:
| {
“jsonrpc”: “2.0”, “id”: 1, “messages”: [ { “role”: “user”, “content”: { “type”: “text”, “text”: “Explain how this python code works:\n\ndef foo(): return 42” } } ] } |
除此外,prompt也支持了listChanged相关接口,其用法和resource一样。
并且在MCP之中,也支持不同类型的消息。
Content之中,包含文本内容
| {
“type”: “text”, “text”: “The text content of the message” } |
图像内容
| {
“type”: “image”, “data”: “base64-encoded-image-data”, “mimeType”: “image/png” } |
音频内容
| {
“type”: “audio”, “data”: “base64-encoded-audio-data”, “mimeType”: “audio/wav” } |
嵌入式资源
| {
“type”: “resource”, “resource”: { “uri”: “resource://example”, “mimeType”: “text/plain”, “text”: “Resource content” } } |
这里我们还会使用一个简单的Demo,来实现MCP模板生成的完整流程
首先需要我们实现服务器端的代码实现。
这里我们定义了两个模板,方便client通过list/prompt来查看有哪些模板并返回。
两个模板分别是code-review和explain-code
一个是让大模型来审查对应的代码;另一个则是去解释一段代码的作用。
| PROMPTS = {
“code-review”: types.Prompt( name=”code-review”, description=”分析代码并提供改进建议”, arguments=[ types.PromptArgument( name=”code”, description=”需要审查的代码”, required=True ), types.PromptArgument( name=”language”, description=”编程语言”, required=True ), types.PromptArgument( name=”focus”, description=”审查重点(可选:performance, security, readability)”, required=False ) ] ), “explain-code”: types.Prompt( name=”explain-code”, description=”解释代码的工作原理”, arguments=[ types.PromptArgument( name=”code”, description=”需要解释的代码”, required=True ), types.PromptArgument( name=”language”, description=”编程语言”, required=True ) ] ) } |
这一段代码之中主要是声明两个prompt的相关元数据信息。
之后是利用@mcp.prompts_list()以及@mcp.prompts_get来注册提示模板
| @app.list_prompts()
async def list_prompts() -> list[types.Prompt]: “””返回可用的提示模板列表””” return list(PROMPTS.values()) |
对应的获取模板则是
| @app.get_prompt()
async def get_prompt( name: str, arguments: dict[str, str] | None = None ) -> types.GetPromptResult: “””根据名称和参数获取提示内容””” if name not in PROMPTS: raise ValueError(f”提示模板 ‘{name}’ 不存在”) if name == “code-review”: code = arguments.get(“code”) if arguments else “” language = arguments.get(“language”) if arguments else “Unknown” focus = arguments.get(“focus”, “general”) if arguments else “general” return types.GetPromptResult( messages=[ types.PromptMessage( role=”system”, content=types.TextContent( type=”text”, text=f”你是一个专业的代码审查助手,专注于{language}代码的{focus}方面。” ) ), types.PromptMessage( role=”user”, content=types.TextContent( type=”text”, text=f”请审查以下{language}代码,并提供改进建议:\n\n{code}” ) ) ] ) elif name == “explain-code”: code = arguments.get(“code”) if arguments else “” language = arguments.get(“language”) if arguments else “Unknown” return types.GetPromptResult( messages=[ types.PromptMessage( role=”assistant”, content=types.TextContent( type=”text”, text=f”你是一个专业的编程导师,擅长解释{language}代码。” ) ), types.PromptMessage( role=”user”, content=types.TextContent( type=”text”, text=f”请解释以下{language}代码的工作原理:\n\n{code}” ) ) ] ) raise ValueError(f”未实现提示模板 ‘{name}’ 的处理逻辑”) |
这里我们根据用户传入的argument,来对Prompt进行初始化。
并返回GetPromptResult类型的结果。
对于客户端来说,我们会通过stdio方式连接client,并通过对应的list_prompts()函数来进行获取。
| class CodeReviewClient:
def __init__(self): self.session = None self.transport = None self.client = OpenAI( api_key=os.getenv(“DEEPSEEK_API_KEY”), base_url=”https://api.deepseek.com” ) self.prompts = None async def connect(self, server_script: str): # 1) 构造参数对象 params = StdioServerParameters( command=”/mnt/external_disk/venv/20250426_MCP_Server/bin/python”, args=[server_script], cwd=”../server” # 设置工作目录为服务器目录 ) # 2) 保存上下文管理器 self.transport = stdio_client(params) # 3) 进入上下文,拿到 stdio, write self.stdio, self.write = await self.transport.__aenter__() # 4) 初始化 MCP 会话 self.session = await ClientSession(self.stdio, self.write).__aenter__() await self.session.initialize() # 5) 获取可用的提示模板 self.prompts = await self.session.list_prompts() # 兼容 dict_items if not isinstance(self.prompts, dict): self.prompts = dict(self.prompts) prompt_list = self.prompts.get(“prompts”, []) print(“可用提示模板:”) for prompt in prompt_list: if hasattr(prompt, ‘name’) and hasattr(prompt, ‘description’): print(f”- {prompt.name}: {prompt.description}”) else: print(f”- 未知提示模板: {prompt}”) async def use_prompt(self, prompt_name: str, arguments: dict[str, str]): # 获取提示内容 prompt_result = await self.session.get_prompt(prompt_name, arguments) # 转换消息格式为 OpenAI API 所需的格式 messages = [] for msg in prompt_result.messages: if isinstance(msg.content, types.TextContent): messages.append({ “role”: msg.role, “content”: msg.content.text }) # 调用 LLM response = self.client.chat.completions.create( model=”deepseek-chat”, messages=messages ) return response.choices[0].message.content async def close(self): if self.session: await self.session.__aexit__(None, None, None) if self.transport: await self.transport.__aexit__(None, None, None) |
最后我们就可以通过初始化这个Client的方式去调用prompt的相关能力
| async def main():
print(“>>> 开始初始化代码审查系统”) if len(sys.argv) < 2: print(“用法: python client.py <server.py 路径>”) return client = CodeReviewClient() try: await client.connect(sys.argv[1]) print(“>>> 系统连接成功”) # 示例代码 sample_code = “”” def calculate_fibonacci(n): if n <= 0: return [] elif n == 1: return [0] fib = [0, 1] for i in range(2, n): fib.append(fib[i-1] + fib[i-2]) return fib “”” while True: print(“\n请选择操作:”) print(“1. 代码审查”) print(“2. 代码解释”) print(“3. 退出”) choice = input(“> “) if choice == “3”: break if choice == “1”: print(“\n请选择审查重点:”) print(“1. 性能”) print(“2. 安全性”) print(“3. 可读性”) print(“4. 综合”) focus_choice = input(“> “) focus_map = { “1”: “performance”, “2”: “security”, “3”: “readability”, “4”: “general” } focus = focus_map.get(focus_choice, “general”) print(“\n正在审查代码…”) response = await client.use_prompt(“code-review”, { “code”: sample_code, “language”: “Python”, “focus”: focus }) print(“\n审查结果:\n”, response) elif choice == “2”: print(“\n正在解释代码…”) response = await client.use_prompt(“explain-code”, { “code”: sample_code, “language”: “Python” }) print(“\n解释:\n”, response) except Exception as e: print(f”发生错误: {e}”) finally: await client.close() print(“>>> 系统已关闭”) if __name__ == “__main__”: asyncio.run(main()) |
最后我们就可以运行这套代码了
分别运行client和server端的py代码
最后去进行交互,获取到提示模板并进行调用。
最后总结下,在MCP之中,Prompt原语定义了一套服务器端注册,客户端发现和调用的消息模板,用于向着LLM提供结构化上下文和指令
客户端可以通过特定的接口来检索模板,并通过特定的参数来生成消息。
最终支持模板结果获取。从而方便位于Host上的LLM调用实现一系列消息的生成,以Host上菜单实现特定交互。