详看CrewAI搭建智能画师Agent
在这一张中,我们查看使用Crew AI搭建智能画师Agent
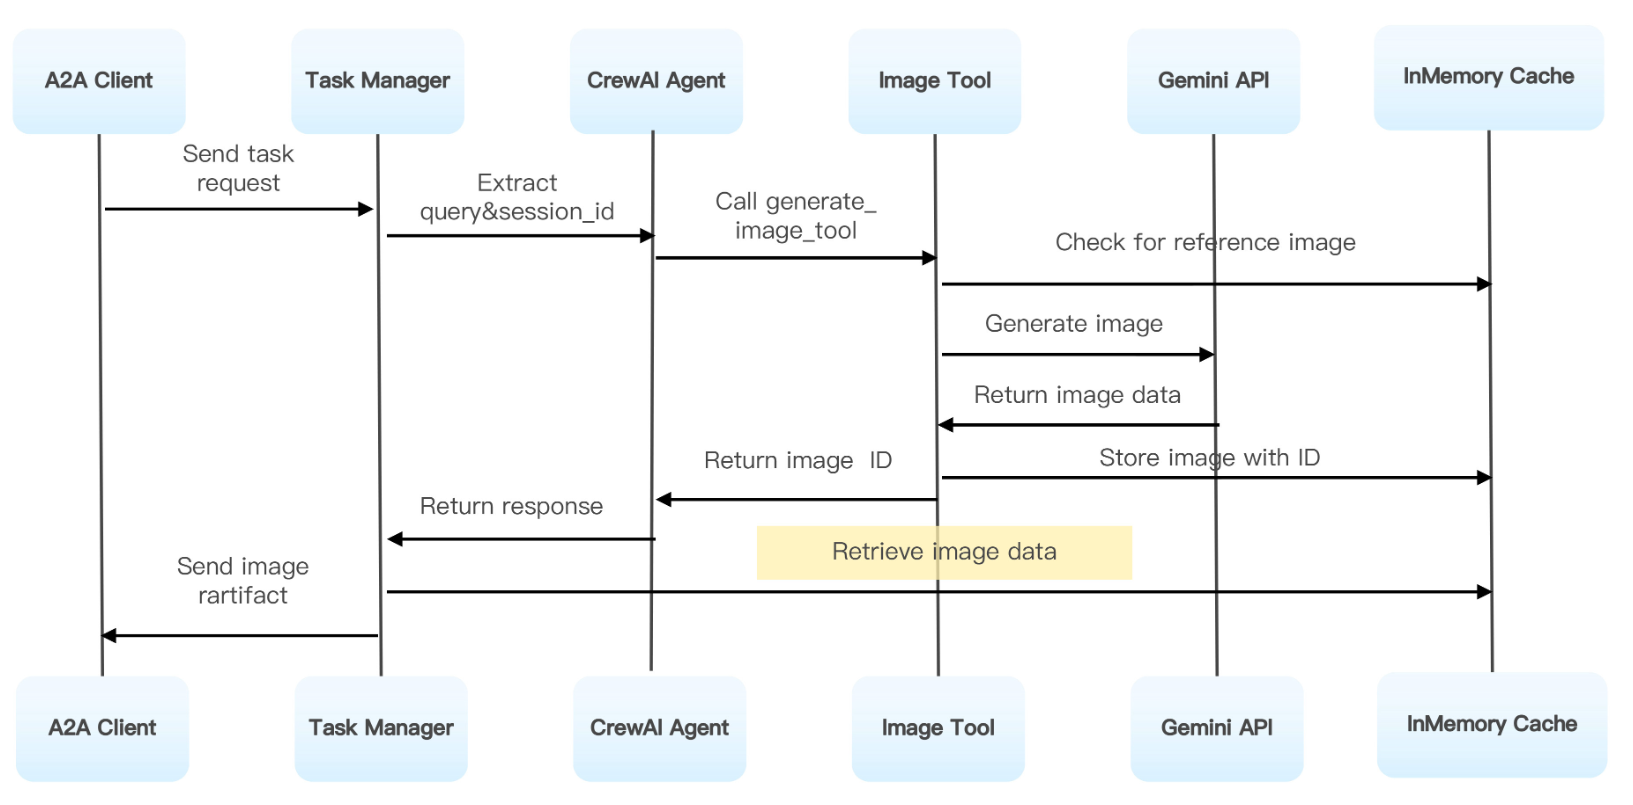
在这个Agent之中,A2A起到了如下三点的作用
- 任务协议标准化,Agent将自己的绘图请求封装为A2A Task,包含prompt,session_id,artifact_id等上下文字段
- Agent接口化,将自己搭建的Crew AI Agent部署为A2A Server,支持远程Agent调用并返回结果
- 平台解耦,UI无需了解Crew AI内部,只需要发送标准化的A2A,既可创建图像
利用如上方式,我们将一个标准的本地Agent,将其进化为了一个支持A2A协议的在线Agent.
因为这个Agent是基于CrewAI框架开发的,所以我们的第一步是针对这个框架,看下如何使用这个框架来进行开发工作。
在这个框架中,每个Agent都拥有自己的角色,工具和目标,通过任务分工和信息共享来共同解决问题。
比如我们定义一个简单的智能体实现。
|
from crewai import Agent, Crew, Task, LLM
import os # 设置 DeepSeek API 密钥 os.environ[“DEEPSEEK_API_KEY”] = “your_deepseek_api_key” # 配置 DeepSeek LLM deepseek_llm = LLM( model=”deepseek/deepseek-chat”, # 或使用 “deepseek-r1” 等具体模型 api_key=os.getenv(“DEEPSEEK_API_KEY”), base_url=”https://api.deepseek.com” ) # 定义一个简单的 Agent researcher = Agent( role=”研究员”, goal=”搜索并总结最新 AI 趋势”, backstory=”你是一位热衷于探索 AI 技术的专家”, llm=deepseek_llm, # 使用 DeepSeek 模型 verbose=True ) # 定义任务 task = Task( description=”查找并总结 2025 年 AI 领域的最新发展”, agent=researcher, expected_output=”一份简短的 AI 趋势总结” ) # 创建 Crew 并执行 crew = Crew( agents=[researcher], tasks=[task], verbose=True ) # 运行任务 result = crew.kickoff() print(result) |
这样我们就实现了一个最简单的单一Agent 的CrewAI。
那么回归到我们的项目之中,我们可以先创建一个智能画师的单机版本
|
import base64
import logging import os import re from io import BytesIO from typing import Any from uuid import uuid4 from PIL import Image from crewai import LLM, Agent, Crew, Task from crewai.process import Process from crewai.tools import tool from dotenv import load_dotenv from google import genai from google.genai import types from pydantic import BaseModel # 加载环境变量 load_dotenv() # 设置日志 logging.basicConfig(level=logging.INFO) logger = logging.getLogger(__name__) class ImageData(BaseModel): “””图像数据模型””” id: str | None = None name: str | None = None mime_type: str | None = None bytes: str | None = None error: str | None = None class SimpleImageCache: “””简单的内存缓存””” def __init__(self): self._cache = {} def get(self, session_id: str): return self._cache.get(session_id, {}) def set(self, session_id: str, data: dict): self._cache[session_id] = data # 全局缓存实例 image_cache = SimpleImageCache() @tool(‘ImageGenerationTool’) def generate_image_tool( prompt: str, session_id: str, artifact_file_id: str = “” ) -> str: “””基于提示词生成图像的工具””” if not prompt: raise ValueError(‘提示词不能为空’) try: # 初始化Google GenAI客户端 client = genai.Client() # 准备文本输入 text_input = ( prompt, ‘如果输入图像与请求不匹配,请忽略任何输入图像。’, ) ref_image = None logger.info(f’会话ID: {session_id}’) print(f’会话ID: {session_id}’) # 尝试获取参考图像 try: session_image_data = image_cache.get(session_id) if session_image_data: if artifact_file_id and artifact_file_id.strip() and artifact_file_id in session_image_data: ref_image_data = session_image_data[artifact_file_id] logger.info(‘找到参考图像’) else: # 获取最新的图像 latest_image_key = list(session_image_data.keys())[-1] ref_image_data = session_image_data[latest_image_key] # 转换为PIL图像 ref_bytes = base64.b64decode(ref_image_data.bytes) ref_image = Image.open(BytesIO(ref_bytes)) except Exception as e: logger.info(f’没有找到参考图像: {e}’) ref_image = None # 准备输入内容 if ref_image: contents = [text_input, ref_image] else: contents = text_input # 调用Google GenAI生成图像 response = client.models.generate_content( model=’gemini-2.0-flash-exp’, contents=contents, config=types.GenerateContentConfig( response_modalities=[‘Text’, ‘Image’] ), ) # 处理响应 for part in response.candidates[0].content.parts: if part.inline_data is not None: # 创建图像数据 image_data = ImageData( bytes=base64.b64encode(part.inline_data.data).decode(‘utf-8′), mime_type=part.inline_data.mime_type, name=’generated_image.png’, id=uuid4().hex, ) # 保存到缓存 session_data = image_cache.get(session_id) if session_data is None: session_data = {} session_data[image_data.id] = image_data image_cache.set(session_id, session_data) logger.info(f’成功生成图像: {image_data.id}’) return image_data.id logger.error(‘没有生成图像’) return “生成失败” except Exception as e: logger.error(f’生成图像时出错: {e}’) print(f’异常: {e}’) return f”错误: {str(e)}” class SimpleCrewAIAgent: “””基于CrewAI的简化图像生成Agent””” def __init__(self): # 初始化LLM if os.getenv(‘GOOGLE_GENAI_USE_VERTEXAI’): self.model = LLM(model=’vertex_ai/gemini-2.0-flash’) elif os.getenv(‘GOOGLE_API_KEY’): self.model = LLM( model=’gemini/gemini-2.0-flash’, api_key=os.getenv(‘GOOGLE_API_KEY’), ) else: # 如果没有API密钥,使用默认模型 self.model = LLM(model=’gemini/gemini-2.0-flash’) logger.warning(“未设置GOOGLE_API_KEY,使用默认配置”) # 创建图像创作Agent self.image_creator_agent = Agent( role=’图像创作专家’, goal=( “基于用户的文本提示词生成图像。如果提示词模糊,请询问澄清问题。” “专注于解释用户的请求并有效使用图像生成器工具。” ), backstory=( ‘你是一个由AI驱动的数字艺术家。你专门从事将文本描述’ ‘转换为视觉表示,使用强大的图像生成工具。你的目标’ ‘是基于提供的提示词实现准确性和创造性。’ ), verbose=True, # 开启详细输出以便调试 allow_delegation=False, tools=[generate_image_tool], llm=self.model, ) # 创建图像生成任务 self.image_creation_task = Task( description=( “接收用户提示词:'{user_prompt}’。\n” “分析提示词并识别是否需要创建新图像或编辑现有图像。” “在提示词中查找代词如这个、那个等,它们可能提供上下文。” “使用图像生成器工具进行图像创建或修改。” “工具需要提示词:{user_prompt},会话ID:{session_id}。” “如果提供了artifact_file_id:{artifact_file_id},请使用它。” ), expected_output=’生成图像的ID’, agent=self.image_creator_agent, ) # 创建Crew self.image_crew = Crew( agents=[self.image_creator_agent], tasks=[self.image_creation_task], process=Process.sequential, verbose=True, # 开启详细输出 ) def extract_artifact_file_id(self, query: str) -> str | None: “””从查询中提取artifact_file_id””” try: pattern = r'(?:id|artifact-file-id)\s+([0-9a-f]{32})’ match = re.search(pattern, query) return match.group(1) if match else None except Exception: return None def generate_image(self, prompt: str, session_id: str = None) -> str: “””生成图像的主方法””” if not session_id: session_id = uuid4().hex # 提取artifact_file_id artifact_file_id = self.extract_artifact_file_id(prompt) # 准备输入 inputs = { ‘user_prompt’: prompt, ‘session_id’: session_id, ‘artifact_file_id’: artifact_file_id or ”, } logger.info(f’开始生成图像,输入: {inputs}’) print(f’开始生成图像,输入: {inputs}’) try: # 启动CrewAI response = self.image_crew.kickoff(inputs) logger.info(f’图像生成完成,响应: {response}’) return response except Exception as e: logger.error(f’生成图像时出错: {e}’) return f”错误: {str(e)}” def get_image_data(self, session_id: str, image_id: str) -> ImageData: “””获取图像数据””” try: session_data = image_cache.get(session_id) if session_data and image_id in session_data: return session_data[image_id] else: return ImageData(error=’图像未找到’) except Exception as e: logger.error(f’获取图像数据时出错: {e}’) return ImageData(error=f’获取图像数据时出错: {str(e)}’) def save_image_to_file(self, session_id: str, image_id: str, filepath: str = None) -> str: “””将图像保存到文件””” try: image_data = self.get_image_data(session_id, image_id) if image_data.error: return f”错误: {image_data.error}” # 如果没有指定文件路径,使用默认路径 if not filepath: import os os.makedirs(“generated_images”, exist_ok=True) filepath = f”generated_images/{image_id}.png” # 解码Base64数据并保存 import base64 image_bytes = base64.b64decode(image_data.bytes) with open(filepath, ‘wb’) as f: f.write(image_bytes) logger.info(f’图像已保存到: {filepath}’) return f”图像已保存到: {filepath}” except Exception as e: logger.error(f’保存图像时出错: {e}’) return f”保存图像时出错: {str(e)}” # 使用示例 def main(): “””主函数示例””” print(“=== CrewAI图像生成Agent示例 ===\n”) # 创建Agent实例 agent = SimpleCrewAIAgent() # 测试图像生成 test_prompt = “一只可爱的小猫坐在花园里,阳光明媚” session_id = “test_session_123″ print(f”提示词: {test_prompt}”) print(f”会话ID: {session_id}”) print(“\n开始生成图像…”) # 生成图像 result = agent.generate_image(test_prompt, session_id) print(f”\n生成结果: {result}”) # 处理CrewAI返回的结果 # CrewAI返回的是CrewOutput对象,需要转换为字符串 if hasattr(result, ‘raw’): # 如果是CrewOutput对象,获取原始输出 result_str = str(result.raw) else: # 如果是字符串,直接使用 result_str = str(result) print(f”处理后的结果: {result_str}”) # 如果成功生成,获取图像数据 if result_str and not result_str.startswith(“错误”): print(f”\n获取图像数据…”) image_data = agent.get_image_data(session_id, result_str) if image_data.error: print(f”获取图像数据失败: {image_data.error}”) else: print(f”图像数据获取成功:”) print(f” ID: {image_data.id}”) print(f” 名称: {image_data.name}”) print(f” MIME类型: {image_data.mime_type}”) print(f” 数据大小: {len(image_data.bytes) if image_data.bytes else 0} 字节”) # 保存图片到文件 print(f”\n保存图片到文件…”) save_result = agent.save_image_to_file(session_id, result_str) print(f”保存结果: {save_result}”) else: print(f”图像生成失败或返回错误: {result_str}”) if __name__ == “__main__”: main() |
在这个代码中,我们主要是创建了一个Agent,并且围绕着这个Agent,创建了一系列的函数以及对象。
包括 LLM 模型
图像创造的Agent
任务定义
Crew来协调这个框架。
此外,利用SimpleImageCache创建一个简单的内存缓存系统,来保存之前的图像数据,方便用户获取历史图像。
在拥有了这样一个单机版本的Agent之后,考虑将这个Agent进一步扩大,让其支持A2A协议,可以连接到支持A2A协议的外部平台。
而在A2A的Agent之中
|
self.image_creator_agent = Agent(
role=’Image Creation Expert’, goal=’Generate an image based on the user\’s text prompt…’, backstory=’You are a digital artist powered by AI…’, tools=[generate_image_tool], llm=self.model, ) |
定义Task
|
self.image_creation_task = Task(
description=’Receive a user prompt: {user_prompt}…’, expected_output=’The id of the generated image’, agent=self.image_creator_agent, ) |
有了Agent和Task,就可以Crew把Agent组装起来
|
self.image_crew = Crew(
agents=[self.image_creator_agent], tasks=[self.image_creation_task], process=Process.sequential, verbose=False, ) |
在这其中,图像生成工具和本机版本一样,通过定义相关的@tool来实现
除此外,就是将原本的单机版本的缓存问题,改为了线程安全的缓存机制。但是保存的结构仍然是
|
{
“session_id”: { “image_id_1”: Imagedata(…), “image_id_2”: Imagedata(…), … } } |
在进行完成这样的设计之后,我们可以剖析下,Agent是如何和Client Host 进行交谈的
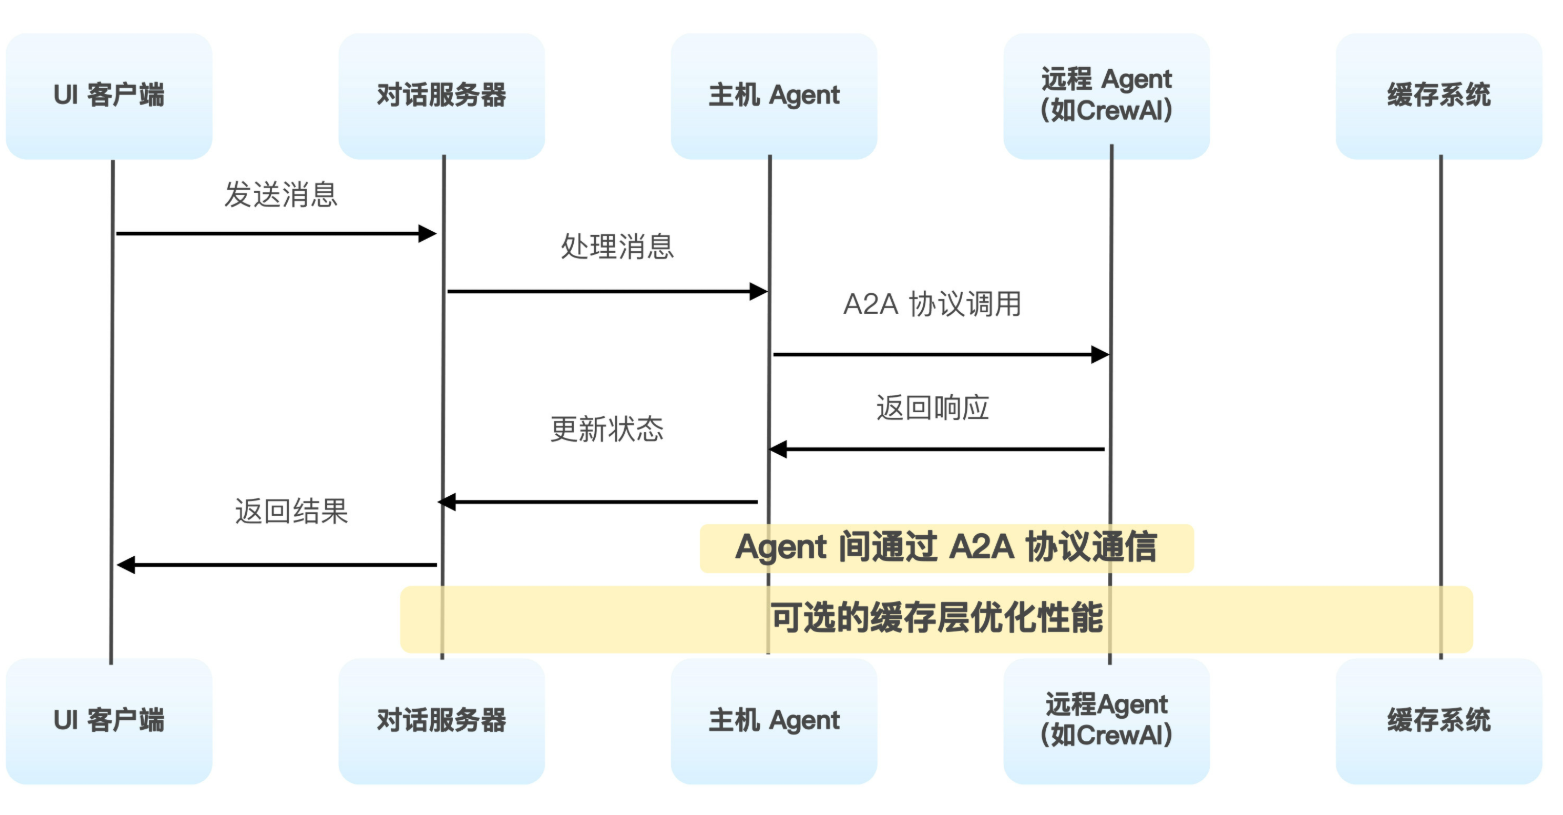
在这个架构中,核心组件包含UI客户端,对话服务器层和主机Agent三层。
具体流程为
Agent进行注册,通过get_agent_card来获取到Agent的能力信息
然后通过AddRemoteAgent来将Agent添加到当前系统中。
之后就是标准的消息发送
只不过在消息发送的时候,首先需要将用户的消息转换为标准的A2A格式
然后再process_message之中处理消息。
|
# 1. 主机Agent处理消息
async def process_message(self, message: Message): # 2. 通过ADK Runner执行 async for event in self._host_runner.run_async( user_id=self.user_id, session_id=conversation_id, new_message=self.adk_content_from_message(message) ): # 3. 处理事件和任务 self.add_event(event) if isinstance(event, TaskCallbackArg): self.emit_event(event, agent_card) |
在这个函数之中,通过adk_content_from_message来将UI消息转换为A2A格式,进行二者间的适配。
这个函数中,就是将消息进行识别,然后进行处理后拼接
|
# 将UI消息转换为A2A格式
def adk_content_from_message(self, message: Message) -> types.Content: parts = [] for part in message.parts: if part.type == ‘text’: parts.append(types.Part.from_text(part.text)) elif part.type == ‘file’: parts.append(types.Part.from_data(part.file.bytes)) return types.Content(role=’user’, parts=parts) |
之后便是等待事件处理和状态更新
这样,我们就可以在启动这个Agent之后,在ui client端进行Agent Card的添加,从而实现相关的能力的使用。
整体代码的流程如上