中介模式,一种不常用的模式,应用场景比较特殊,而且少见,但是代码实现并不困难
中介模式的英文翻译是 Mediator Design Pattern,
其定义为,中介模式定义了一个单独的中介对象,来封装一组对象的交互,将这组对象之间的交互委派给中介对象交互,来避免对象之间的直接交互
在之前说的如何给代码解耦中,我们说可以引入中间层,实际上,中介模式的设计思想和中间层很像,通过引入中介这个中间层,来将一组对象之间的交互关系,从多对多的关系变为一对多的关系,原本一个对象要和n个对象进行交互,现在只需要和一个中介对象进行交互,从而简化了对象之间的交互关系,降低了代码的复杂度,提高了代码的可读性和可维护性
从原本的彼此交互
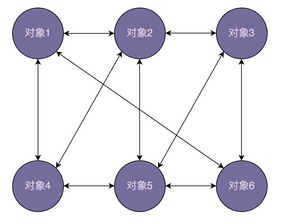
到现在的只与中介交互
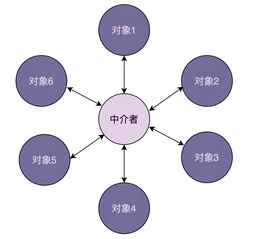
交互关系变的更加简洁,清晰
从编程中举例,我们来看中介模式,拿UI控件来举例,我们对某个控件进行操作的时候,其他的控件会做出对应的反应,比如,我们在下拉框中选择了注册,注册相关的控件就显示在对话框汇总,我们在下拉框汇中选择了登录,登录相关的控件就显示在了对话框中
对于这种情景,我们进行了简单的开发,实现如下
控件之间,彼此操作,彼此依赖
| public class UIControl {
private static final String LOGIN_BTN_ID = “login_btn”; private static final String REG_BTN_ID = “reg_btn”; private static final String USERNAME_INPUT_ID = “username_input”; private static final String PASSWORD_INPUT_ID = “pswd_input”; private static final String REPEATED_PASSWORD_INPUT_ID = “repeated_pswd_input”; private static final String HINT_TEXT_ID = “hint_text”; private static final String SELECTION_ID = “selection”; public static void main(String[] args) { Button loginButton = (Button)findViewById(LOGIN_BTN_ID); Button regButton = (Button)findViewById(REG_BTN_ID); Input usernameInput = (Input)findViewById(USERNAME_INPUT_ID); Input passwordInput = (Input)findViewById(PASSWORD_INPUT_ID); Input repeatedPswdInput = (Input)findViewById(REPEATED_PASSWORD_INPUT_ID); Text hintText = (Text)findViewById(HINT_TEXT_ID); Selection selection = (Selection)findViewById(SELECTION_ID); loginButton.setOnClickListener(new OnClickListener() { @Override public void onClick(View v) { String username = usernameInput.text(); String password = passwordInput.text(); //校验数据… //做业务处理… } }); regButton.setOnClickListener(new OnClickListener() { @Override public void onClick(View v) { //获取usernameInput、passwordInput、repeatedPswdInput数据… //校验数据… //做业务处理… } }); //…省略selection下拉选择框相关代码…. } } |
然后利用中介模式,我们抽取一个中介类,让各个控件之和中介对象交互,中介对象负责对应的实现逻辑
| public interface Mediator {
void handleEvent(Component component, String event); } public class LandingPageDialog implements Mediator { private Button loginButton; private Button regButton; private Selection selection; private Input usernameInput; private Input passwordInput; private Input repeatedPswdInput; private Text hintText; @Override public void handleEvent(Component component, String event) { if (component.equals(loginButton)) { String username = usernameInput.text(); String password = passwordInput.text(); //校验数据… //做业务处理… } else if (component.equals(regButton)) { //获取usernameInput、passwordInput、repeatedPswdInput数据… //校验数据… //做业务处理… } else if (component.equals(selection)) { String selectedItem = selection.select(); if (selectedItem.equals(“login”)) { usernameInput.show(); passwordInput.show(); repeatedPswdInput.hide(); hintText.hide(); //…省略其他代码 } else if (selectedItem.equals(“register”)) { //…. } } } } public class UIControl { private static final String LOGIN_BTN_ID = “login_btn”; private static final String REG_BTN_ID = “reg_btn”; private static final String USERNAME_INPUT_ID = “username_input”; private static final String PASSWORD_INPUT_ID = “pswd_input”; private static final String REPEATED_PASSWORD_INPUT_ID = “repeated_pswd_input”; private static final String HINT_TEXT_ID = “hint_text”; private static final String SELECTION_ID = “selection”; public static void main(String[] args) { Button loginButton = (Button)findViewById(LOGIN_BTN_ID); Button regButton = (Button)findViewById(REG_BTN_ID); Input usernameInput = (Input)findViewById(USERNAME_INPUT_ID); Input passwordInput = (Input)findViewById(PASSWORD_INPUT_ID); Input repeatedPswdInput = (Input)findViewById(REPEATED_PASSWORD_INPUT_ID); Text hintText = (Text)findViewById(HINT_TEXT_ID); Selection selection = (Selection)findViewById(SELECTION_ID); Mediator dialog = new LandingPageDialog(); dialog.setLoginButton(loginButton); dialog.setRegButton(regButton); dialog.setUsernameInput(usernameInput); dialog.setPasswordInput(passwordInput); dialog.setRepeatedPswdInput(repeatedPswdInput); dialog.setHintText(hintText); dialog.setSelection(selection); loginButton.setOnClickListener(new OnClickListener() { @Override public void onClick(View v) { dialog.handleEvent(loginButton, “click”); } }); regButton.setOnClickListener(new OnClickListener() { @Override public void onClick(View v) { dialog.handleEvent(regButton, “click”); } }); //…. } } |
我们将分散的业务逻辑进行了整合,集中到了中介类中,这样我们简化了控件之间的交互,坏处是中介类可能变成大而复杂的上帝类 God Class,使用中介模式的时候,我们需要考虑交互的复杂度和中介类本身的复杂度
中介模式和观察者模式的联系
之前我们说观察者模式的时候,我们讲到,观察者模式有很多的实现,虽然经典的实现方式没法去彻底的解耦观察者和被观察者,但是像是异步非阻塞的实现中,我们利用了消息队列,做到了彻底解耦,观察者和被观察者都只需要和消息队列交互,观察者不知道被观察者的存在,被观察者也不知道观察者的存在,而中介模式也是类似,所有的交互只和中介类相关联,而观察者模式能够解耦的消息队列,也是类似中介模式中的中介类,观察者模式的双方,就是中介模式中的参与者,那么中介模式和观察者模式如何去区分和联系呢?
观察者模式汇总,交互方式往往是单向的,一个参与者要么是观察者,要么是被观察者,不会兼有两种身份
中介模式则是相反,因为参与者的关系错综复杂,维护成本高的时候,才会考虑使用中介模式,因为中介模式可能产生大而复杂的上帝类,而且一个参与者的改变,可能导致其他参与者执行操作先后的要求,中介模式就可以利用中介类,通过调用不同参与者的方法,实现顺序的控制,可能就是解耦的并不完全
本章重点
中介模式的设计思想和中间层很类似,通过引入中介这个中间层,将一组对象之前的交互,从多对多转变为了一对多,原本一个对象要和n个对象交互,现在之和一个对象交互,提高了代码的可维护性
观察者模式和中介模式很类似,但是两者的不同在于观察者模式的应用场景中,往往身份单一,一个类的身份要么是观察者,要么是被观察者,中介模式的应用场景中,参与者的交互关系错综复杂
课后思考
讲到观察者的EventBus的时候,我们都认为这是观察者模式的实现框架,EventBus作为一个事件处理的中心,订阅都通过这个中心来实现,这个EventBus是否是中介模式的实现框架呢?
个人认为是很像的,EventBus其本质上就是为了在交互双方的基础上进行了抽取,形成了这个框架,可以被称为是中介,但是也只是像,因为观察者模式的这种实现本身就和中介模式类似,但是也只限于这种实现罢了,因为比起中介模式那种更加具体的中介类,EventBus将交互双方解耦的更加详细